Glens LCV King Cab

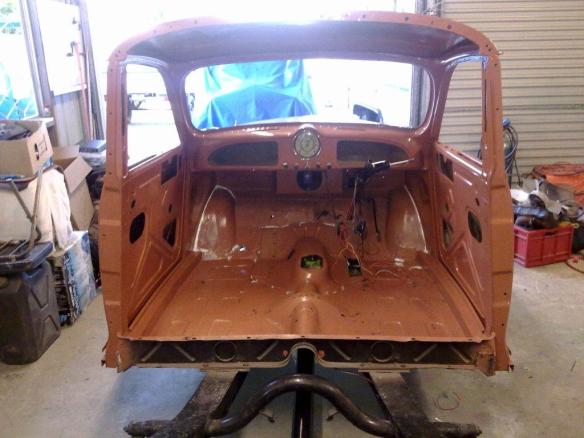
This may look like just any Morris Minor Ute but take a closer look at the length of the door and the shortness of the style-side tray…

Glen has used the front body section from a two door to improve the usually woeful cabin space in a Morris LCV. Tray has been carefully shortened so that the result looks almost stock.

a lift up lid looks good on the back

Personally I don’t like these tail lights at all, it would be far better to have the stock lights IMHO

bonnet anyone?

Grill panel

Chassis progress

Having finally sorted out a problem with my Mig welder and getting a new bottle of Argo shield gas I have actaully been able to make  some real progress. As might be expected from a 60 year old chassis there was some repairs needed. At the back I had a large rust hole behind the plate that had been  roughly welded on to attach a towbar this was patched with a nice new piece of 1.6 steel. At the front the cross member had been scavenged to repair another chassis but this was not a big deal as I needed to modify it anyway. It took me a while but I managed to graft in a new cross member made out of 75 x 50  RHS which was set at the extreme end of the chassis to provide the attachment point for the front panel but also the extra clearance needed for my engine swap at the rear another piece or RHS replaces the rear cross member the replacement is moved as far forward as is practicable without compromising clearance for the spring hanger. One M8 nut has been set into the rear cross member to carry the back of the Barina fuel tank and a bracket has been added to the shock mounting cross member all it needs is one more bracket on the driver’s side and the tank will be secure. I also added another M8 fixing to support the exhaust on the near side of the cross member.

Here you can see the new cross member that I have fitted to the front of the chassis, Morris experts will notice that there is now no taper at the front underside.
this was done to facilitate the fixing of the front grill panel when the body is channelled 65mm and to provide adequate clearance for the engine

this is the new gearbox cross member that I have made its made from 25 x75 x2mm RHS and the cut out is there so that two Suzuki gearbox mounts can be bolted to its lower wall to give the perfect mounting hight, it will bolt through the chassis rails at the sides and the bottom and its final position will be determined once I test fit the engine and transmission then I will weld some M8 nuts inside the rails to hold it

The new cross member is a great deal more rigid than its replacement and It now has mounting points for the fuel tank and the exhaust.  I had to patch the rail on the right where a Tow bar had been welded on but thanks to my trusted MIG  its now sound.

The next step is to fit the engine and transmission to the chassis so that the new gearbox cross member can be fitted in the right place and I will then attach the rear suspension and dif to work out the best route for the exhaust and minor details like fuel and brake lines  this will be fixed to M6 nuts welded into the chassis rail this is of course a big improvement on the rust inducing bits of tin bent around the pipes fitted at present, like wise I will be running two brake lines to the rear of the car ( needed for the cross split system) and I hope that I can get double duty out of those mounting points.

The FWD exhaust manifold  should allow the pipe to squeeze between the block and the chassis rail, I then want it to follow the inside of the rail through the centre cross-member and up and over the dif to exit on the LHS the only problem is running the  exhaust through the cross-member which has a conveniently  placed hole which can be enlarged but not enough allow room for a clearance flange

Going for a full chassis on the car

Its been a while since I posted an update here, that is mainly because progress has been rather scant of late due to my back having flared up making any progress impossible. nonetheless I have been scheming, planning and dreaming about just how to make the Morris into something very special for my number one child. In the near future I’m getting a Ute chassis from my brother and the new plan is to use it with the two door  saloon body which will be channelled by about  65mm so that the floor is level with top of the  bottom door frame.

To keep the right relationship between the steering and suspension components at the front the plan is to be very clever about where the 65mm comes out of the firewall by cutting across just above the cross member in the body and keeping the front inner guards connected to that and the floor by separating the front inner guard from the outer panel along the join   the  it will be possible to lower the body retain all of the suspension travel and get the desirable low stance.

I will alter the back of the chassis so that the over hang is minimised as much as possible so that when the body is fitted everything is neat and tidy and so that the boot lid can be locked with the original mechanism. Although there will be some loss of boot space this is not going to be a family car so that will not be much of an issue . In any event the spare wheel space is inadequate for a modern wheel and tyre.

Using the Ute chassis should keep the transport department happy because the car will essentially be a re-bodied Morris Ute  which actually already has nice little refinements like mountings for telescopic rear shocks. The chassis won’t need much adjusting to fit beyond replacing the rear cross member with one that is made of 50 x 50 x 1.6  RHS. like wise the front needs the same treatment  a piece of 50 x 50 x 1.6  RHS to replace the cross member but it will need to be positioned so that  a piece of strip can be welded to the bottom edge to provide a fixing point for the bottom of the front panel which will of course be sitting 65mm lower at the front. because I have designed the engine mounts to just fit to the standard mounting holes the engine will just drop into the chassis without any dramas at all .

The radiator is going to need either replacement or modification because now it will need to be about 65mm shorter. I think that a cross flow jobbie might just be required .

Ok,  that is the the thinking behind this radical move and I hope that it makes sense. I do appreciate that there would be a   small weight penalty from running a full chassis but I know that the car is still going to be very light even by Morris standards

Cheers Comrades

Progress report : engine mounts done

The most significant thing that I have done over the last few days is to make the gearbox mount. I agonised over the design of this for a long time and in the end I decided to utilise the original Morris mount rubbers on the original cross member this bolts to the fabricated mount that I made from steel which bolts to the Suzuki rear mount spigot on the gearbox. I will have to modify the cover to clear the gearbox but hopefully it won't look too bad when I have finished

To get the gearbox where I wanted it I had to remove one of the four electric switches mounted on the gear case ( Green arrow) these are used to indicate which gear you are in on the Suzuki and its not something that I will have working in the car so they can be deleted with out a problem. The bolt (blue arrow) is just touching the steering rack and when I get my own gearbox I will repalce it with a countersunk Allen bolt to give enough clearance for motor movement

My brother gave me this panel from another Morris and I may use it to replace the now removed battery box but now that I have the engine mounted up and its clear that I don't need to have any recess to clear the distributor I may yet go for just a plain piece of steel to fill the hole in the fire wall.

Managed to get the sierra manifold as well as a sump and pick-up and here you see that I have test fitted it to the motor just to see how it looks in the Morris. The top of the thermostat housing will have to be replaced because it is just too corroded. when I tried to take it off both of the bolts were seized and snapped off! Fortunately I was able to get the broken bolts out.

Progress Report Jan 2012

On the passenger side of the block it is necessary to provide room for the lower radiator hose connection (I have got the radiator out of a Camry which is wide and thin) so I am using one of the original cut down mounts that I made in association with an extensive re working of the Suzuki bracket. I have cut that in half and adapted one side to bolt to the unused air con mounting spigots on the block and the other to the front most of the original spigots with a bit of jiggery pokery I have arrived at this rather complicated shape.

On the drivers side I have decided to ditch the engine mount that I originally made in favour of just using a 3mm plate drilled to accept the Subaru mount this makes it low enough for me to rework the original mount to come off the bottom of the alternator bracket to make the connection to the block stronger I have also modified part of the bracket so that it transfers some of the load to two of the original mounting points this should be more than adequate .

Rather than using a plain piece of steel I have cut a section from the Sierra firewall to replace the battery box and It both suits the need for space for the distributor and looks the part.

For the rear I will be using the gearbox rubber mount from the Barina and adapting the the Morris minor gearbox cross member to suit. this should not be that difficult to get right. but I will also be making provision for my solution to the lack of a speedo drive with the Sierra gearbox, the plan is to use an O ring as a drive belt from the tail-shaft dust cover on the front uni joint running to a pulley attached to the speedometer drive from the front wheel of a motorcycle, Now I have one from an 1985 Fz750 Yamaha that should do the job once I calculate the right diameter for the pulley I may even be in the right ball park for an accurate speedo if I do my sums right!

As can bee seen the original Barina exhaust manifold has an outlet that will allow the exhaust to go down between the block and the chassis rail. Now as much as I would like to have a nice set of extractors using the original manifold is the best low-cost option the pipe will gow down and under the chassis rail and then run in the same place as usual .

G13 Engine in the Morris Minor engine bay

After a couple of days of steady graft the engine is out of the Barina and now sitting in the Morris engine bay and as the photos below show it seems that it will fit pretty well.

The engine was originally sitting at about a 20 degree angle and I have it perfectly upright so I may have to make  an adaptor to bring the carb back to a level orientation.

The front pulley is currently sitting on the front cross member and It needs to be about 20mm higher so that the fan belt can be changed.
There is room for a radiator here and I want to get a wide radiator probably from somne sort of FWD Jap car  so that I can have two fans one each side of the engine
There are a couple of protuberances on the distributor boss that I can trim down a bit and this my just be enough clearance from the cross member especially if I move the motor  10mm forward I think that the back of the motor should be sitting a little lower but I won’t know for sure until I get  a gearbox connected to it
The water outlet on the manifold will clearly need to be reworked I will make and adaptor that allows me to have it exit in a better direction, likewise the heater fixture will need to be different

Got the engine donor for our project !

I am delighted to report that the $50 Barina (Suzuki swift clone) actually runs and more importantly it runs well despite having been a cubby house for some children for the last couple of years. The interior is crap the brakes don’t work at all the Radiator leaks but after some argy bargy I managed to coax it into life, as it happens the choke was stuck closed and once I wedged that open with a screwdriver it started with a roar. Tomorrow my daughter and I are going to fix some wires (for the lights and indicators) that were cut in the process of freeing the steering lock and then once we ascertain how well they work we can begin removing the engine and stripping the car of anything useful for the Morris.

As it stands we will be using the following ;

Engine

Complete electrical system

instruments (to be modified ),

Exhaust  (to be modified)

Fuel lines (feed, return and vent line for charcoal canister )

brake lines hard and flexible

As the radiator is shot with some leaks in the core I will have to find another and a mate with an old  Pintara may have something suitable

Its definitely progress to have acquired this car and I will post some photos once we start to dismember it tomorrow

Anyone would think that its Christmas or something 😉

Peter’s van progress 02

My brother Peter is going great guns with his van restoration and I thought I would post the latest photos that he has sent me:

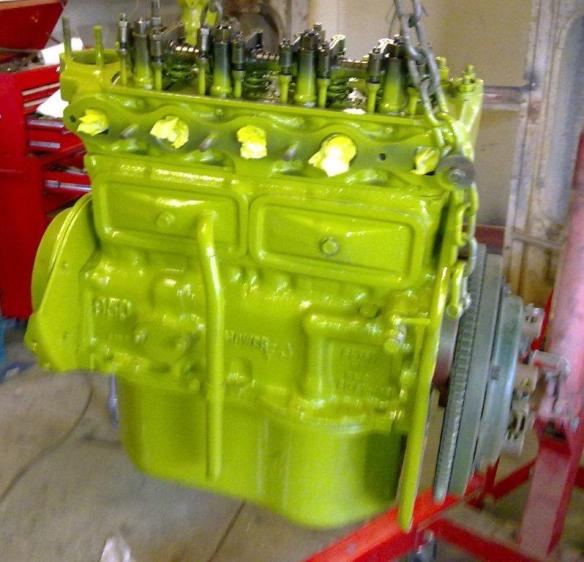
this is the engine for the van that peter got in another car it runs well and I think the colur is a bit washed out form the camera flash because Peter tells me that it is the correct shade of green

of course an engine needs a gearbox and this is the one for the van

Doors on a 50 year old car can often have many layers of paint to remove

black is a good colour for a floor

Undercoat makes such a difference!

looking good!